Cutting Twill with the GX-24

UPDATE:  For anyone that is interested, there will be an oncore performance of the Cutting Twill webinar given by my co-worker, Josh Ellsworth on Feb 24 and Feb 25.  Please follow This Link to sign up for or see additional information on this free webinar. 
 

cuttingtwill

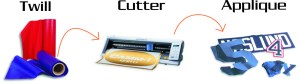
Cutting Twill with the Roland GX-24 is pretty simple.  I’ve created a step-by-step for you to follow to fully understand the process. 

You’ll need the following:

    • Roland GX-24
    • Cut Studio Design Software (included with the GX-24)
    • Imprintables Twill Stitch Pro
    • 60 Degree Carbide Blade
    • Pressure Sensitive Poly-Twill

Here’s the process:

Cutting

  • Import your artwork into Cut Studio.   You can import .eps or .ai files directly into Cut Studio.  If you currently use Corel Draw or Illustrator, you can also use the Cut Studio Plug-In to bring the artwork directly in.
  • Make sure your design is NOT mirrored.  Unlike the standard Heat Applied Materials that you are accustomed to cutting, Poly-Twill is cut in the positive. 
  • Make sure your design is sized the way you want it.  You will not be able to change the size after you cut!
  • On the GX-24, make sure you do a test cut to check cutting depth.  You’ll want to put the 60 degree blade in there before doing your test cut. 
  • In Cut Studio, Click on “Cutting” icon that’s on the top tool bar.  On the cutting dialog box that pops up, click “OK”.
  • After the design has finished cutting, take the material off of the machine and weed away the excess material.

Digitizing

  • Back in the Cut Studio software, take the same design and again click on the “Cutting” icon.
  • This time, make sure the “Print to File” box is checked and then click “OK”.
  • Change the “Save As Type” to All Files.  When naming your file, put a .plt on the end of the file name ex. adamyukish.plt.  Once named, click “Save”.
  • Open up the Imprintables Twill Stitch Pro Software and start with a blank white screen.
  • Import your saved artwork into the Twill Stitch Pro.
  • You should have the “Tree View” box open on the left.  Right Click on the color and then scroll down to “Convert To”.  Arrow over to “Tackle Twill”.  This will put place the stitches on your design. 
    • Note that you can also add a placement line and tack down line and change the density, inset, etc by right clicking on the selected design and going down to properties.
  • Once you have the stitches the way you want them, you’re ready to create your sew disk.  Click on “File” and then “Save As”.  There are many different extensions to pick from.  Make sure you choose the one that matches up to your embroidery machine. 

This wraps up the cutting and design side of creating your own appliques using the GX-24.  All that’s left is to use the cut twill and the digitized file to finish it off. 

A video showing this process will be coming, it will be a little redundant, but sometimes visual is more effective than reading.

If there are any questions, let me know!

Leasing Equipment Q&A

When is it a good idea to Lease equipment vs other purchasing options?  I’ve asked Chris Pfriem with ACG Equipment Finance to help answer a lot of the common questions about leasing. 


Q:  What are the primary benefits of leasing equipment vs. other purchasing options? 

A:  Generally, there are a few reasons why customers choose to lease in an “up market and also in tighter financial market we face today.”  First, leasing offers 100% tax deductibility.  Second, leasing conserves companies lines of credit with their bank since LEASING is “Off Balance Sheet” financing.    Companies can use Leasing for equipment purchases and keep their LINES of credit open for cash reserves or payroll, or for expansion purposes.  Lastly, many of my repeat customers come back to ACG for convenience.  Banks prior to freezing up credit can and in many instances are hard to work with.  Banks want financial statements from an accountant which costs money and time.  With LEASING, for most transactions up to $100,000.00, all that is needed is a one page credit application.  Decision time for LEASING is usually within a 24 hour period.  Banks can take days to make a decision.


Q:  What are the tax benefits of a lease*? 

A:  100% of the monthly payment is written off as an expense. 

 *It is recommended that you consult with your tax professional to review your tax savings based on your tax bracket and financial situation.


Q:  Do you have a minimum purchase amount to apply for a lease? 

A:  $1,000.00 


Q:  What is the timeframe from start to finish to receive my equipment? 

A:  We have many customers approved the same day they have submitted their credit application.  Once we receive the quote from Imprintables, we email the contracts to the customer and include a pre-paid FED-X label.  Once we receive the originals, we issue Imprintables the PO, and from there Imprintables ships the equipment. This can take just 24-48 hours to get completed.  (I suggest all customers contacting their Imprintables representative for shipping times and dates for delivery)  


Q:  What are the payment terms that are available? 

A:  We lease from 12, 24, 36, 48, or 60 months.


Q:  Can you be flexible with your payment plans?

A:  YES, depending on credit and the customers time in business, we have offered 3 and 6 month deferred payment plans to help a customer with cash flow while getting their equipment running for profitability. 


Q:  Are there buy-out options? 

A:  We have 2 buyouts.  One and the most common is a $1.00 buy out lease.  At the end of the term, the customer owns the equipment for $1.00.  The other and less common is a 10% residual lease.  Example for a $19,000.00 deal…After the lease is over a 10% or $1,900.00 balloon payment is required to be done with the lease.  (A 10% buy out lease would have a lower payment vs.. the $1.00 buy out lease.) 


Q:  What is my monthly payment? What is the rate? 

A:  In Leasing, we do not use an APR.  This is a LEASE and not a loan.  With leasing, we use a monthly matrix factor to calculate the rental payment.  This matrix factor is based on risk..  The lower the payment, the lower the risk etc.  Payments are calculated basically with 2 things.  First, is the personal credit.  Second, is the companies time in business. 


Q:  What if I am a new business and what if I have “not so good” credit? 

A:  We have a very high approval percentage at ACG.  We have programs to fit most credits and we do new businesses. 

Most approvals are good for 60-90 days.  Chris suggests to any customer who is interested to Email Him about your needs and your credit and to fill out a credit application.  There is NO OBLIGATION once approved.

Chris also asked that I post some additional documents that can also be helpful.  Please download and read the “Why Lease” and “Lease vs Bank vs Cash” documents from the “Box” on the left.

Comparing the Versacamm – Direct To Garment

Many of my customers have asked me to compare the Versacamm to many different types of Garment Decoration technologies.  The most common of which is Direct To Garment printing. 

The first thing to keep in mind is cost.  Generally speaking, the popular Direct To Garment printers have a price range of $10,995 up to $29,995.  Keep in mind this is only pricing the Direct To Garment printers that are in the same “class”.  What do you get for your money?  The lower end printers give you the ability to print onto 100% white Cotton T’s, that’s it.  There is also a printer in the $20,000 range that will give you the ability to print onto both light and dark garments, as well as some Cotton/Poly blends with a pretreatment.  The recurring cost in any printer that you choose is the ink.  For a dark garment, you’re looking between $4 to $5 per shirt for a 10×10 print. 

Unfortunately, the pretreatment can add as much as three minutes to each shirt that you press.  Time is money.  Durability is also an issue on the dark garments.  A shirt printed with Direct To Garment printing onto a dark garment will only last about 20 washes.  For most of your customers, this will not be enough.  You can actually get a similar quality using a $60 inkjet printer and Opaque Inkjet Transfer Paper.  Curing a dark garment will add a couple more minutes to each garment.

How much extra time do you have to service your machine?  With most Direct To Garment printers, you need quite a bit.  Clogging print heads is a common problem.  The cost to replace a print head is around $300.  Do you have to ship the machine back to have it replaced?  If so, you better make sure it is well packaged.  Those machines aren’t very light, how much will the shipping charge be?  If your supplier ships you one, are you qualified to change it?  Will you void the remaining warranty if you get in there and do something that you’re not supposed to?  These questions and many more have to be considered when making your purchasing decisions.

Now for the Versacamm.  For the purpose of this post, we’ll limit our comparison to the 30″ models.  54″ models are also available, but we’re comparing machines that are primarily for garment decoration here.  There are two 30″ Versacamm’s available, the SP-300 and the VP-300.  The SP-300 costs the same as the low end Direct to Garment Printers, $10,995 while the VP-300 runs $14,995.  The difference between the Direct To Garment prints and a shirt done with a Versacamm is that the Versacamm prints on a transfer media that has to be pressed onto the shirt.  For cost comparison sake, if you add the cost of ink and the cost of the transfer media, you’re looking between $3.50 and $4 per transfer. 

Quality wise, it is very tough to be the quality that a transfer printed with the Roland Versacamm will give you.  Durability is unmatched.  Once pressed, the transfer should look the same wash 100 as it does the day you apply it.  How many other decoration methods can you say that about?  The feel of the transfer is also exceptional. 

As far as the maintenance on the machine, take a vacation.  First, when you buy the machine, the company that you purchase from (This guy – adam@imprintables.com) will come to your location, install the machine and train you how to use it.  The Versacamm has a great feature where it will clean itself.  You can program the machine to run a head clean as often as you wish.  As long as you leave the main power on (there is a power switch on the machine that basically puts in in sleep mode), the Versacamm will turn itself on and run a little bit of ink through to make sure there are no head clogs.  Now if something where to go wrong with the machine, the installer is still responsible to come out and fix any issues. 

Now what if you want do decorate some materials other than the standard cotton or cotton/poly blend?  With a Direct To Garment printer, you’re out of luck.  With the Versacamm, it’s your lucky day.  The materials offered by Imprintables Warehouse for use with the Versacamm give you the ability to decorate virtually any type of fabric.  Using our Solutions Opaque material, you can apply to cotton, poly, Nylon, leather, canvas, performance, spandex and more!  Solutions gives you an amazing hand, opacity, durability and stretchability.  You can decorate bags, gloves, shoes, jerseys, compression wear, performance wear, mouse pads, jeans, hoodies…ok I’m rambling.  A lot! 

Here is my challenge.  If you’re considering any Direct To Garment printer, do your homework. 

– Ask me for a sample of what you’ll get with a Versacamm and ask the same of the company that your considering a Direct To Garment printer from. 

– Wash test.  Take those same samples and wash them under the conditions that you think you’re customers will be washing them.  See which one looks better.

– Compare costs.  I’ll be happy to help you get the true cost of any prints done with the Versacamm vs. the Direct to Garment. 

– Make a wise investment.  Either way you look to go, you’re going to be spending some money.  You need to make sure it’s going to be profitable for you both short term and long term. 

I’m sure there are a lot of questions that you still have.  Be on the look out for posts in the near future comparing the SP-300 to the VP-300, introducing the 54″ machines and more comparisons to other competing technologies.  If you can’t wait, please email me at adam@imprintables.com with any questions you may have.